Tag: AWS

  • Configuring AWS Control Tower with AWS SSO and Azure AD

    Configuring AWS Control Tower with AWS SSO and Azure AD

    Limitations:

    AWS SSO Limitations:

    • a. AWS SSO can only be used with AWS Control Tower in the same AWS Region.
    • b. AWS SSO can be associated with only one AWS Control Tower instance at a time.
    • c. AWS SSO can only federate with one external identity provider (IdP) at a time.

    Azure Active Directory (AAD) Limitations:

    • a. Azure AD can only be used as an external identity provider (IdP) with AWS SSO, which then integrates with AWS Control Tower.
    • b. Azure AD must be configured as a SAML-based IdP to integrate with AWS SSO.
    • c. There might be certain limitations or restrictions specific to Azure AD features or configurations when used in conjunction with AWS SSO.

    Control Tower Limitations:

    • a. Control Tower supports only SAML-based federation for single sign-on (SSO) with AWS SSO.
    • b. Control Tower doesn’t support other identity federation protocols like OpenID Connect (OIDC).
    • c. Control Tower currently supports only one AWS account as the management account.

    Miscellaneous Limitations:

    • a. Ensure compatibility of SAML versions between AWS SSO and Azure AD. AWS SSO supports SAML 2.0, but Azure AD might support multiple versions. Verify compatibility and adjust SAML configurations accordingly.

    Considerations:

    When configuring AWS Control Tower with AWS SSO and Azure Active Directory (AAD), there are several considerations to keep in mind:

    1. Identity Source and User Management:
      • a. Decide on the primary identity source for user management. In this case, it would be either AWS SSO or Azure AD. Consider factors such as user provisioning, synchronization, and group management capabilities each identity source provides.
      • b. Determine how AWS SSO and Azure AD will synchronize user accounts and groups. This can be done manually or by leveraging automation tools like AWS Directory Service or Azure AD Connect.
    2. SAML Configuration:
      • a. Ensure that the SAML configurations between AWS SSO and Azure AD are compatible. Verify the SAML versions supported by each service and adjust the configuration accordingly.
      • b. Pay attention to the SAML attributes and claims mapping to ensure that user attributes like usernames, email addresses, and roles are correctly mapped and passed between the services.
    3. Security and Access Control:
      • a. Define appropriate access controls and permissions for users and groups in both AWS SSO and AWS Control Tower. This includes assigning roles and policies within AWS Control Tower to ensure proper access to resources and guardrails.
      • b. Implement multi-factor authentication (MFA) to enhance security for user access to AWS Control Tower and associated AWS accounts.
      • c. Regularly review and update user access permissions as needed, especially when user roles or responsibilities change.
    4. Regional Considerations:
      • a. Keep in mind that AWS SSO and AWS Control Tower need to be set up in the same AWS Region. Consider the availability and performance requirements of your AWS resources and choose the appropriate AWS Region for deployment.
      • b. Consider any data residency or compliance requirements when selecting the AWS Region and configuring AWS Control Tower and associated services.
    5. Monitoring and Auditing:
      • a. Implement logging and monitoring solutions to track user access, changes to permissions, and any suspicious activities within AWS Control Tower and associated AWS accounts.
      • b. Regularly review audit logs and generate reports to ensure compliance with security and regulatory requirements.
    6. Documentation and Training:
      • a. Document the configuration steps, settings, and any customizations made during the integration process for future reference.
      • b. Provide training and guidance to users, administrators, and support teams on using and managing AWS Control Tower, AWS SSO, and Azure AD integration.

    Configuration:

    To configure AWS Control Tower with AWS Single Sign-On (SSO) and Azure Active Directory (AAD), you need to follow these steps:

    1. Set up AWS Control Tower:
      • a. Log in to your AWS Management Console.
      • b. Navigate to the AWS Control Tower service.
      • c. Follow the provided documentation or wizard to set up AWS Control Tower in your AWS account. This includes setting up the Control Tower lifecycle, organizational units (OUs), and guardrails.
    2. Set up AWS SSO:
      • a. Navigate to the AWS SSO service in the AWS Management Console.
      • b. Follow the documentation or wizard to set up AWS SSO in your AWS account.
      • c. Configure user attributes and identity sources as required.
    3. Set up Azure Active Directory (AAD):
      • a. Log in to the Azure portal.
      • b. Navigate to Azure Active Directory.
      • c. Follow the documentation or wizard to set up Azure AD in your Azure subscription.
      • d. Configure user attributes and identity sources as required.
    4. Set up federation between AWS SSO and AAD:
      • a. In the AWS SSO console, go to Settings.
      • b. Under Identity Source, choose “Add new identity source.”
      • c. Select “SAML” as the type and provide a name for the identity source.
      • d. Download the AWS SSO metadata file.
      • e. In the Azure portal, go to Azure Active Directory.
      • f. Navigate to the Enterprise applications section and select “New application.”
      • g. Choose “Non-gallery application” and provide a name for the application.
      • h. Under Single sign-on, select SAML.
      • i. Upload the AWS SSO metadata file.
      • j. Configure the SAML settings according to the AWS SSO documentation.
      • k. Save the SAML configuration.
    5. Assign users and groups to AWS Control Tower:
      • a. In the AWS SSO console, go to the AWS accounts tab.
      • b. Select the AWS Control Tower account and click on “Assign users/groups.”
      • c. Choose the appropriate users and groups from the AWS SSO directory.
      • d. Grant the necessary permissions for Control Tower access.
    6. Test the configuration:
      • a. Log in to the Azure portal using an account from AAD.
      • b. Navigate to the AWS Management Console using the AWS SSO link.
      • c. You should be able to access Control Tower resources based on the assigned permissions.
  • This is how we hit the limit in Amazon EFS

    This is how we hit the limit in Amazon EFS

    When we architect the application, it is essential to consider the current metrics and monitoring logs to ensure its design is future-proof. But sometimes, we do not have the necessary logs to make the right decisions. In that case, we will let the application run in an architecture that we think seems optimized – using the metrics we had access to – and let it run for a while to capture logs required to apply necessary changes. In our case, the application has grown to the point where we could not expect it to happen!

    The COVID-19 has increased the consumption of all online applications and systems in the organization, whether modern or legacy software.

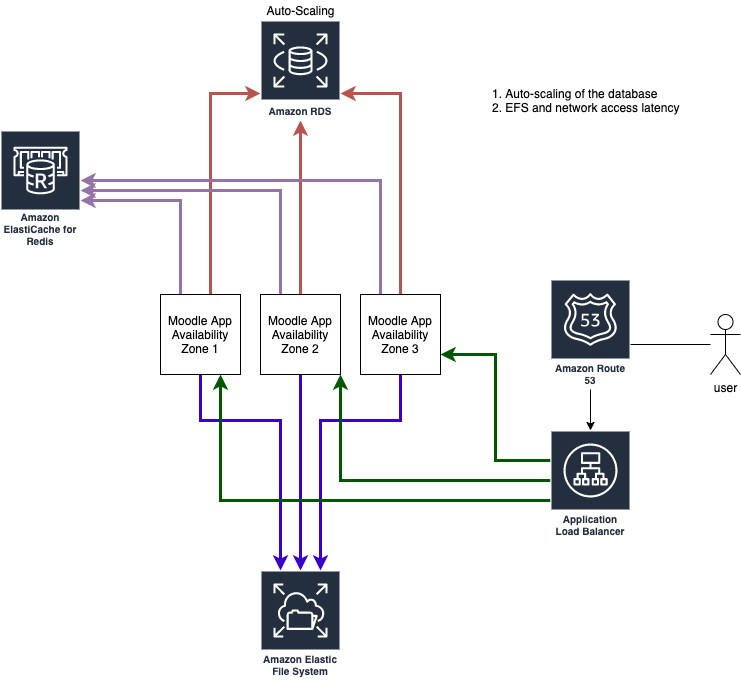
    We have an application that is spanned across three availability zones with EFS mount points in each AZ retrieving data from and Amazon Aurora Serverless. In the past two weeks, we realized the application is getting slower and slower. Checking the EC2 and database activity logs did not help, and we learned something could be wrong with the storage. Unexpectedly, the issue was, in fact, caused by the EFS limitation for I/O on general-purpose performance mode.

    In General Purpose performance mode, read and write operations consume a different number of file operations. Read data or metadata consumes one file operation. Write data or update metadata consumes five file operations. A file system can support up to 35,000 file operations per second. This might be 35,000 read operations, 7,000 write operations, or a combination of the two.

    see Amazon EFS quotas and limits – Quotas for Amazon EFS file systems.

    After creating an EFS file system, you cannot change the performance mode, and with having almost 2 TB of data in the file system, we were concerned about the downtime window. AWS suggests using AWS DataSync to migrate the data from either on-premises or any of the AWS storage offerings. Although DataSync could offer help to migrate the data, we already had AWS Backup configured. So, we used AWS Backup to take a complete snapshot of the EFS and restore it as a Max I/O file system.

    Note that Max I/O performance mode offers a higher number of file system operations per second but has a slightly higher latency per each file system operation.

    Moodle Application Architecture

  • How to use EFS to store cx_Oracle, Pandas, and other python packages?

    How to use EFS to store cx_Oracle, Pandas, and other python packages?

    This post focuses on how to use the EFS storage to store large packages and libraries like cx_Oracle, pandas, and pymssql and import the packages in AWS Lambda. Considering the Lambda package size limitation that is inclusive of layers, larger functions packages and libraries must be stored outside the Lambda package.

    There are some steps that you do not need to follow as it has been done, and you can mount the EFS to your lambda and import the package. However, I will be logging the steps to ensure we all can reference the steps in the future – technical debt.

    In short:

    1. launched an EC2
    2. created an EFS Storage
    3. SSH to the EC2
    4. Mount the EFS to the EC2
    5. created a sample python venv project
    6. installed all the package requirements I had in the virtual environment
    7. moved the site_packages contents to the EFS/packages directory
    8. created a directory in EFS and called it sl (shared libraries)
    9. moved the libraries including the cx_Oracle the EFS/sl/oracle
    10. created a test function in AWS Lambda using the code below
    11. added an environment variable entry in the AWS Lambda Configuration
    12. and Test

    In Long:

    I will start the details from step 4 onwards:

    mkdir efs mount -t nfs4 -o nfsvers=4.1,rsize=1048576,wsize=1048576,hard,timeo=600,retrans=2,noresvport fs-6212b722.efs.ap-southeast-1.amazonaws.com:/ efs

    Then I downloaded the latest version of instant client from Oracle website here (Basic Package (ZIP)):

    wget https://download.oracle.com/otn_software/linux/instantclient/211000/instantclient-basic-linux.x64-21.1.0.0.0.zip
    unzip instantclient-basic-linux.x64-21.1.0.0.0.zip

    Renaming the directory to oracle before copying it to the EFS:mv instantclient_21_1 oracle

    creating the necessary directories in EFS

    mkdir -p efs/sl/

    Then moving the oracle instant client to the efs

    mv oracle efs/sl/

    Now I will be creating a python virtual environment in EC2 to download the necessary packages and copy them to the EFS

    python3.8 -m venv venv 
    source venv/bin/activate 
    pip install pandas cx_Oracle pymysql mymssql

    Let’s check the packages in the venv site packages and then copy them to the EFS

    ls venv/lib64/python3.8/site-packages/ 
    mkdir -p efs/packages 
    mv venv/lib64/python3.8/site-packages/* efs/packages/

    At this point, we have python requirements and shared objects/libraries copied to the EFS. Let’s mount the EFS in Lambda and try using the libraries and objects.


    To mount the EFS in AWS Lambda go to Configuration > File systems and click on Add file system.

    Once you select the EFS file system and Access point you will need to enter the Local mount path in the AWS Lambda which must be an absolute path under /mnt. Save the file system and go to the next step.

    You must add the environment variable before moving to the function test.

    To add an environment variable go to Configuration > Environment variables

    Click on the Edit and then Add environment variable and enter the key and value as per below:

    LD_LIBRARY_PATH=/mnt/lib/packages:/mnt/lib/sl/oracle/lib:$LD_LIBRARY_PATH

    ^^^^^^^^^^ Pay attention to the path and joins

    Sample Python code to test the libraries:

    import json 
    import sys 
    import os 
    
    sys.path.append("/mnt/lib/packages") 
    
    import cx_Oracle 
    
    
    conn = 'username/password@123.123.123.123/ORCL' 
    curs = cx_Oracle.Connection(conn) 
    

    You must append the system path with the packages directory from the mount point sys.path.append(“/mnt/lib/packages”).

    Cheers